Well the parts finally arrived – Yippee!!! (continued from here) Now to install it!
The failed one (replaced under warranty in 2011) was part number 05156106AA, replacement I got is 05156106AD.
I got mine from factorymorparparts.com but they sent it via USPS and it took almost 3 weeks to get here. I have heard Rockauto.com is a good place to get them.
As for part numbers, this might help:
Manufacturer: Mopar
Part Number: 5156106AD
Part: Air Bag Clockspring
Replaces: 5156106AA, 5156106AB, 5156106AC, 68000477AA, 68003216AA, 68003216AB, 68003216AC, 68003216AD, 68003216AE, 68003216AF, 68003216AG, 68003216AH
![20140802_150951_zpssn65flce[1]](http://www.justaskdave.com.au/wp-content/uploads/2014/08/20140802_150951_zpssn65flce1.jpg)
Ok. So first and most importantly – DISCONNECT THE BATTERY…. I have multiple terminals on my battery, all factory wiring to the main terminal and all auxiliary wiring to the secondary terminals. So I simply disconnect the main, slide a piece of scrap timber underneath to avoid it touching again and go make a cuppa and wait for at least 10-15 minutes for all voltage to drain out of the system (you don’t want the airbag to go off in your face).
![20140802_154016_zpsnm3c5roa[1]](http://www.justaskdave.com.au/wp-content/uploads/2014/08/20140802_154016_zpsnm3c5roa1.jpg)
Now remove the steering column cover, three screws underneath, two of them at the front and one in the middle. All are Torx 20 screws, the front ones need a long shank T20 to reach them. Once the screws are out the lower cover will drop away (with some convincing as it is clipped to the top half and a tight fit over the ignition). I then had to lower the steering column to get the top half off.
![20140802_144415_zpsc1bjqym6[1]](http://www.justaskdave.com.au/wp-content/uploads/2014/08/20140802_144415_zpsc1bjqym61-168x300.jpg)
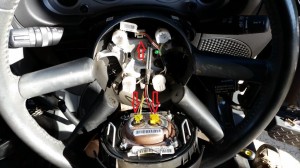
Now the hardest part by far of the whole process, removing the horn. The horn is held on by 3 clips, at approx 10, 2 and 6 (as in position on a clock). These clips are a U shape wire about the thickness of coat hangar wire, protruding out from the horn button toward the dash and clipping under an alloy “hook” on the steering wheel. This is the horn already removed so you can see the 3 wire loops to give you an idea what you are dealing with (click on any of the pics for a full screen view).
This pic might be a little hard to work out, but if you look behind the steering wheel, you will see the holes (at 10, 2 and 6) where you access these clips to remove the horn. This pic is looking from the dash board side back up into the back of the steering wheel (so I could see the clips for myself to see what I was dealing with!) They are about 1cm in and reasonably tight. There is a factory tool of course to remove them, so not having one I filed the small end of a old 3mm allen key down to about 1/2 thickness and put a small notch a mm in from the end to help. Push this in the hole under the wire as hard as possible then push on the horn and the wire clip should push over the end of the lever you made up. Using the lever bend the wire clip out a little and release the horn and hopefully that section will come away from the steering column. Takes a couple of tries and then it works! This is the wire clip over the alloy “hook” looking in from the back of the steering wheel, and the tool I made to release the wire:
![20140802_145537_zpsqobtxnxe[1]](http://www.justaskdave.com.au/wp-content/uploads/2014/08/20140802_145537_zpsqobtxnxe1.jpg)
![20140802_155134_zpss3rucmcn[1]](http://www.justaskdave.com.au/wp-content/uploads/2014/08/20140802_155134_zpss3rucmcn1.jpg)
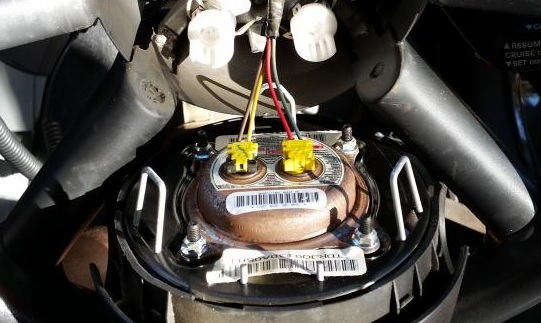
OK, with the horn off as per below you will see three wires/plugs, two to the horn assembly and one to the top of the steering wheel – all three need to be unplugged (the yellow ones are colour coded, one yellow and one yellow/black so you can’t mix them up).
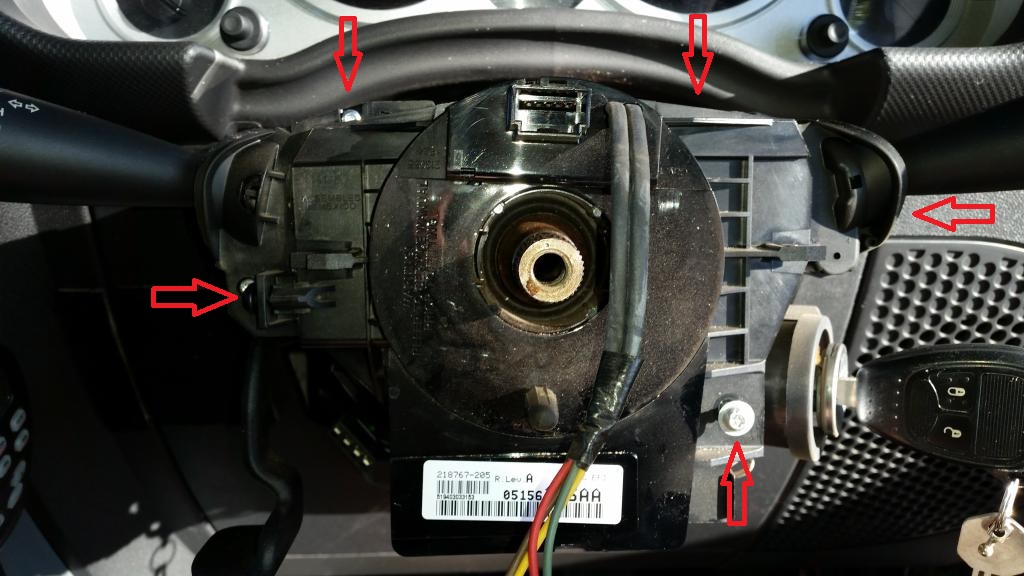
Then loosen the bolt in the centre of the steering wheel a couple of turns only, and pull on the steering wheel possibly needing to wriggle a little and it will pop toward you then stop when it hits the bolt (the bolt stops the steering wheel hitting you in the face 🙂 ) Now remove the Phillips screw holding the indicator stalk in place and slide it left far enough to be free. Same again with the single screw for the wiper stalk sliding it out to the right then just let them dangle. There are three Torx 20 screws now holding the clock spring itself in place, removing the stalks exposes the two at the top, plus the one on the front right. The top ones are a pain to remove, I had a small socket set that had 1/4in drive with a universal joint and torx bits – made it a lot easier!
![20140802_152444_zpsgpqy9pzh[1]](http://www.justaskdave.com.au/wp-content/uploads/2014/08/20140802_152444_zpsgpqy9pzh1.jpg)
Pull the Clock Spring assembly to ward you and remove the three connectors.
![20140802_152144_zpspgezp6qt[1]](http://www.justaskdave.com.au/wp-content/uploads/2014/08/20140802_152144_zpspgezp6qt1.jpg)
Plug them into the new one, making sure to leave the yellow/white blank/locating plug in the top connector of the new clock spring for now as per the below pic. Stick the new clock spring into place, screw it on front and top, replace the indicator and wiper stalks and screw them into place, put the steering wheel back on (will not go on off centre due to the design of the spline) making sure to feed the horn wiring through the top of the wheel like it was to start with. Replace the steering wheel bolt at stick everything else back together.
![20140802_153157_zpsvpg9vwgg[1]](http://www.justaskdave.com.au/wp-content/uploads/2014/08/20140802_153157_zpsvpg9vwgg1.jpg)
Now all that is required to go for a quick test drive to make sure your light is off!
John said on August 3, 2014
Great post. Hope I never have to change mine but at least I have some great instructions here.
Aaron Krieger said on May 7, 2017
This has been super helpful, my horn stopped working a few months later my airbag light came on and just recently my headlights and blinkers stopped working. It must be my clocks print.
Dave said on May 8, 2017
Hi Aaron, that definately sounds like your clockspring. If you are in Australia they have finally issued a recall on these and are replacing them at no charge. If you are in the US I believe same thing but they have been doing it for years!
Jack said on October 27, 2020
Hi is this a recall for Jeep Compass models?