The time came where I finally had a shed out the back and enough room to make up a hoist to enable easy removal and safe out of the way storage for the hard top. So after many months deliberating how to do it, which way to do it etc I finally came to a decision and this is the result.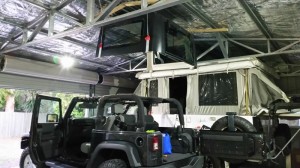
My criteria: Had to be easy to use, had to lift as high as possible. Pretty simple really!
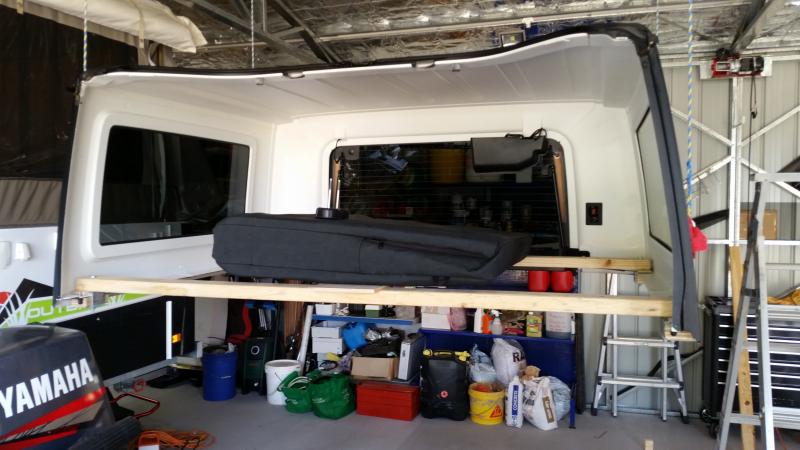
So with the idea of lifting as high as possible I looked at most of the commercially available options and they all lift from either a single point above the roof or from a strap running under the front and out the back window. Whilst these are easy to implement they did not meet my maximum lift criteria as the pulley system ends up above the hard top limiting its max height.
I saw a post on a US forum where the hoist was for a basket style roof rack and the owner installed some ropes and hooks on the outer edges to grab the hard from the lower outside edges allowing it to pull up flush against the rack – I liked this idea as it brought the top up high.
So to start. I have a standard centre peak roof on the shed with nice solid battens holding up the tin, so I bolted 4 pieces of timber to the battens to run either side of the hard top to attach the pulleys to. The ropes would go over the pulleys on the outside of the hard top. The ropes I wanted to run across to the peak of the roof to the top of a truss as a common point for all the ropes to give a straight pull back to the wall. Also the length from the peak of the roof to the wall was enough to allow the ropes to go from full lifted height right down to the floor. I wanted this so if I ever required I could drop the hard top to the floor.
So many calculations, measurements, recalculations and remeasuments later I started building! Since a pic is worth a 1000 words, here is a video overview:
The details:
The hard top is tapered in toward the top so I mounted the timber supports so that the pulleys would be level with the outer edge of the bottom of the hard top, that way the top would be able to pull up between them. This came to 1570mm apart for the pulleys (1500mm apart for the 70x35mm timber I used). These are securely bolted to the roof battens and the pulleys are then mounted so they are directly above the front and rear hard top mounting holes (at 970mm apart front to back).
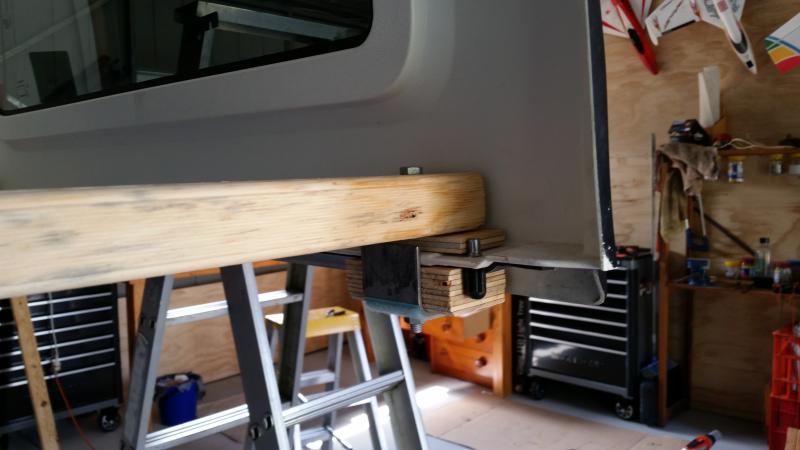
The brackets are designed in a J shape, made from 3mm thick, 50mm wide steel strip from Bunnings. They were marked at 40mm and then 105mm then bent just over 90 degrees each to give a gap of 65mm in the J. I then made a 27mm thick timber seat for the base of the J from 3 pieces of 9mm ply I had lying around. The idea of this is create a platform for the hard top mounting surface to sit on without the lip of the hard top hitting the bracket and potentially damaging it. The block is only 55mm wide, leaving the gap for the lip to sit in.
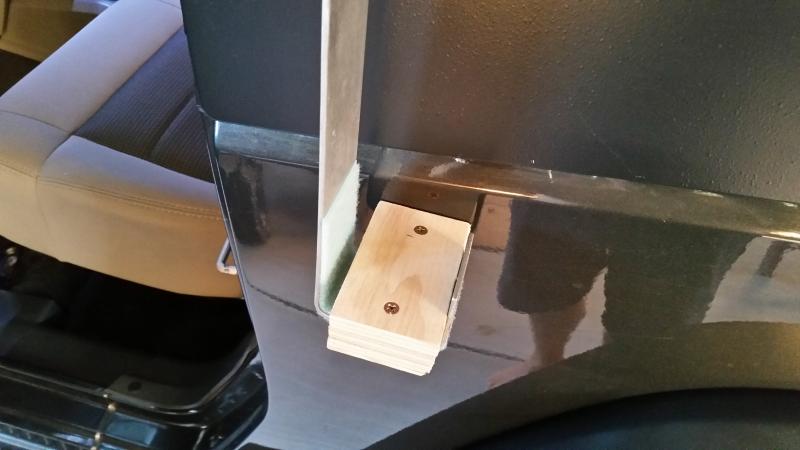
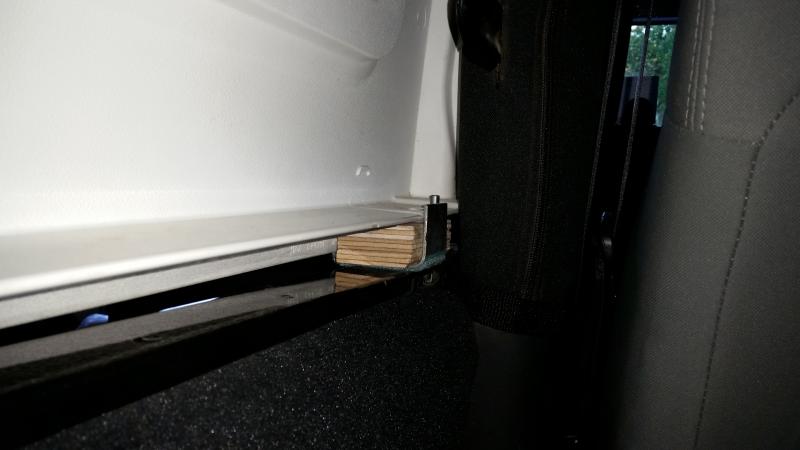
Once these were installed and after removing the top I dropped this back to the floor and marked and pilot drilled them for a bolt that could be placed right through the hard top, the bracket and an additional piece of timber running across the hard top on the inside. This was to prevent the hard top spreading over time and provide a shelf to store the front roof panels. The bolt hole positions for the ‘shelf’ timbers were measured from the bolts on the tub to ensure the top was held at the correct width (front 1550mm apart, rear 1525mm apart). I drilled the holes in the ‘shelf’ timber first, then placed that on top of the bracket and used that as a vertical guide to continue the pilot holes in the brackets right the way through.
For ropes I used some 6mm Telstra rope I had lying around. I did a little research and found its breaking strain is over 600kg so should have no problems, though I have found it does stretch so may replace this in the future with steel ropes (2 or 3mm or so). Using the rope I decided to learn rope splicing as well to make it look neat, and also splicing only reduces the ropes strength by around 10%, compared to a knot that can reduce strength by 30% to 50%. So I spliced some small D shackles to the bracket end and mounted them up. The pulleys, after a lot of looking around and major surprise at the prices wanted for them, I ended up buying 40kg rated pulleys from ebay for about $30 for 10 (the same price as one locally!). The pulleys are mounted to the timber with eye bolts, with the end of the eye sliced off to allow the pulley to be fitted on. These were then pulled up tight into the timber which blocked off the eye anyway. The far side ropes then were directed to the top of the roof by a second set of pulleys to get the ropes up as high as possible, above the maximum height of the hard top. The ropes from all four brackets then run across to a block of 4 pulleys mounted up at the top of the truss to the side so that all 4 ropes had a central place to pull from keeping them together.
All four ropes then run along the line of the truss to the central connection for the winch. Originally I was going to use a manual brake winch (one with a friction brake so it can be wound in or out and stops as soon as pressure is removed from the handle), but when it arrived it was a normal ratchet winch! I sent that back for a refund and after looking around the cheapest I could find was going to be close to $100 including freight. Whilst looking I stumbled on electric 240v winches and found one with a 125kg / 250kg lifting capacity for just $88 delivered so jumped on it.
This was then mounted at the top of the wall, securely to the wall and the roof truss, then connected to the 4 ropes.
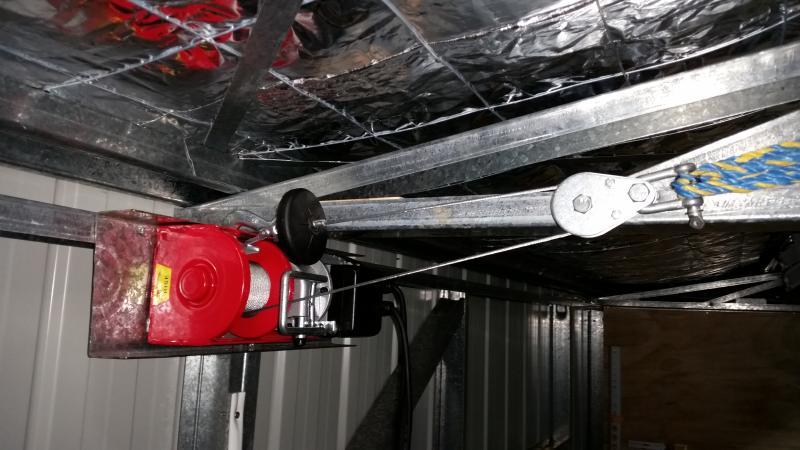
Again I spliced the ropes to make it neat and maximum strength, though had to redo them a few times to get the lengths correct, then again once the ropes settled.
and in use:
Hope that helps, any question send me a message!
Cheers, Dave.
Dave said on June 22, 2015
You’ve been a busy boy haven’t you! Well done!